zlib的安装与使用 |
您所在的位置:网站首页 › unsigned char *source › zlib的安装与使用 |
zlib的安装与使用
|
转载于 http://blog.csdn.net/htttw/article/details/7616124
zlib的安装与使用
zlib是一个很好的压缩解压缩库,今天我们分别介绍如何在Linux与Windows上安装与使用:
一:Linux平台
首先看看自己的机器上是不是已经安装好zlib了: whereis zlib 如果安装好了,会输出zlib的路径,这样直接跳过前2步。
1. 在http://www.zlib.net/下载zlib的最新版,我的是1.2.3(官网貌似上不去,可以找别的地方下载)
2. 解压,编译: ./configure make sudo make install
3. zlib安装好了,下面我们写一个程序测试一下: Makefile: [cpp] view plaincopy all: test.c gcc -Wall -o test test.c -lz clean: rm -rf *.o test
注意到,我们用-lz加入了zlib库
test.c [cpp] view plaincopy #include #include int main() { /* 原始数据 */ unsigned char strSrc[] = "hello world! aaaaa bbbbb ccccc ddddd 中文测试 yes"; unsigned char buf[1024] = {0}; unsigned char strDst[1024] = {0}; unsigned long srcLen = sizeof(strSrc); unsigned long bufLen = sizeof(buf); unsigned long dstLen = sizeof(strDst); printf("Src string:%s\nLength:%ld\n", strSrc, srcLen); /* 压缩 */ compress(buf, &bufLen, strSrc, srcLen); printf("After Compressed Length:%ld\n", bufLen); /* 解压缩 */ uncompress(strDst, &dstLen, buf, bufLen); printf("After UnCompressed Length:%ld\n",dstLen); printf("UnCompressed String:%s\n",strDst); return 0; }
4. 运行结果如下所示:
呵呵,只压缩掉了一个字节。
我们用到了两个函数:compress和uncompress: 压缩: int compress(unsigned char * dest, unsigned long * destLen, unsigned char * source, unsigned long sourceLen);
dest:压缩后数据保存的目标缓冲区 destLen:目标缓冲区的大小(必须在调用前设置,并且它是一个指针) source:要压缩的数据 sourceLen:要压缩的数据长度 compress()函数成功返回Z_OK,如果内存不够,返回Z_MEM_ERROR,如果目标缓冲区太小,返回Z_BUF_ERROR
解压缩: int uncompress(unsigned char * dest, unsigned long * destLen, unsigned char * source, unsigned long sourceLen); dest:解压后数据保存的目标缓冲区 destLen:目标缓冲区的大小(必须在调用前设置,并且它是一个指针) source:要解压的数据 sourceLen:要解压的数据长度 uncompress()函数成功返回Z_OK,如果内存不够,返回Z_MEM_ERROR,如果目标缓冲区太小,返回Z_BUF_ERROR,如果要解压的数据损坏或不完整,返回Z_DATA_ERROR。
二:Windows平台
zlib提供了用VC++6.0编译的版本,因此我们首先在Windows下编译zlib的源代码,然后再用上面的例子测试:
1. 解压zlib-1.2.3-src.zip(文末有链接),打开zlib.dsw,直接编译,提示: 'ml.exe' 不是内部或外部命令,也不是可运行的程序或批处理文件。
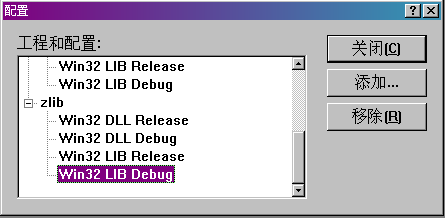
2. 因为ml.exe是微软的汇编编译器,我们不需要,因此:Build-->Set Active Project Configuration,将所有的带"ASM"的项都去掉,然后选择Win32 LIB Debug,如下图:
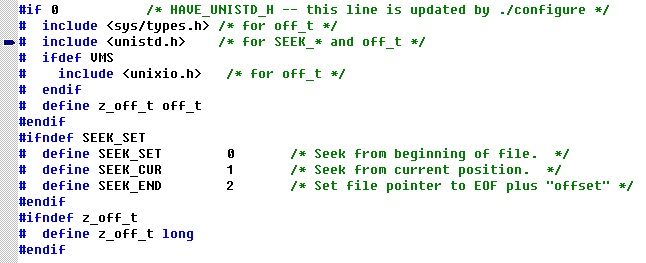
3. 在zlib classes上右键选择设为启动项目,然后再编译,出现如下错误: fatal error C1083: Cannot open include file: 'unistd.h': No such file or directory compress.c
unistd.h是Linux下的文件,我们不需要,只要将#if 1 改为#if 0即可,如下图所示:
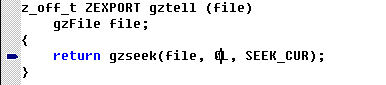
4. 再编译,发现出现如下4个错误: error C2059: syntax error : 'bad suffix on number' error C2146: syntax error : missing ')' before identifier 'L' error C2198: 'gzseek' : too few actual parameters error C2059: syntax error : ')'
没关系,将0LL改为0L即可(即去掉一个L),如下图:
5. 再编译,没有错误,如下图:
6. zlib编译好后,会生成zlib1.lib和zlib1.dll两个文件,这正是我们需要的。
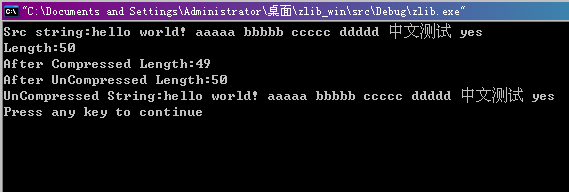
下面还是用之前的测试程序: 新建一个VC++6工程,加入如下的代码,并将zlib1.dll拷贝到项目目录下: [cpp] view plaincopy #include #include "../zlib/include/zlib.h" #pragma comment(lib, "../zlib/lib/zlib1.lib") int main() { /* 原始数据 */ unsigned char strSrc[] = "hello world! aaaaa bbbbb ccccc ddddd 中文测试 yes"; unsigned char buf[1024] = {0}; unsigned char strDst[1024] = {0}; unsigned long srcLen = sizeof(strSrc); unsigned long bufLen = sizeof(buf); unsigned long dstLen = sizeof(strDst); printf("Src string:%s\nLength:%ld\n", strSrc, srcLen); /* 压缩 */ compress(buf, &bufLen, strSrc, srcLen); printf("After Compressed Length:%ld\n", bufLen); /* 解压缩 */ uncompress(strDst, &dstLen, buf, bufLen); printf("After UnCompressed Length:%ld\n",dstLen); printf("UnCompressed String:%s\n",strDst); return 0; }
和之前的程序类似,只多了#pragma comment,这里需要填入zlib1.lib的正确路径
然后运行,一切正常,如下图:
呵呵,我们发现同样的字符串在Linux和Windows上长度是不一样的!
另外还要说的是我们编译的VC++6.0版的zlib工程中包含一个example示例程序,可以参考参考。
为了方便大家,本文的所有源码都可以下载: http://download.csdn.net/detail/htttw/4340134
下面是网上摘录的zlib的其他重要函数:
关键的函数有那么几个: (1) int compress2 (Bytef *dest, uLongf *destLen,const Bytef *source, uLong sourceLen,int level);功能和上一个函数一样,都一个参数可以指定压缩质量和压缩数度之间的关系(0-9)不敢肯定这个参数的话不用太在意它,明白一个道理就好了: 要想得到高的压缩比就要多花时间
(2) uLong compressBound (uLong sourceLen); 计算需要的缓冲区长度. 假设你在压缩之前就想知道你的产度为 sourcelen 的数据压缩后有多大, 可调用这个函数计算一下,这个函数并不能得到精确的结果,但是它可以保证实际输出长度肯定小于它计算出来的长度 (3) deflateInit() + deflate() + deflateEnd(); 3个函数结合使用完成压缩功能,具体用法看 example.c 的 test_deflate()函数. 其实 compress() 函数内部就是用这3个函数实现的(工程 zlib 的 compress.c 文件)
(4) inflateInit() + inflate() + inflateEnd() 和(5)类似,完成解压缩功能.
(5) gz开头的函数. 用来操作*.gz的文件,和文件stdio调用方式类似. 想知道怎么用的话看example.c 的 test_gzio() 函数,很easy.
(6) 其他诸如获得版本等函数就不说了.
|


【本文地址】